How to Hang Curtains on Corner Windows

You don’t often find a room with corner windows, but they are a bit more common in living rooms and primary bedrooms. If you’re feeling stuck on how to dress them, you’ve come to the right place! In this blog, we’ll show you how to hang curtains on corner windows using two methods.
Houses with quirky features like corner windows may seem like a drag to decorate, but there are simple ways that you can use this funky feature to your advantage.
Before You Start...
Prior to hanging curtains on any window, there are a few steps you’ll need to take to get set up.
Decide on Window Treatments
Weigh your options and decide what kind of window treatments will best accentuate the corner window. Since corners are tight, you’ll want to consider which patterns (or solid colors) look best with the window and the room.
Measure for Curtains and Rods
Measure your window — width and height — to determine curtain size. Check out our guide on how to measure for curtains the right way.
Next, measure for curtain rods. For corner windows, the curtain rods' length depends on the distance between the windows.
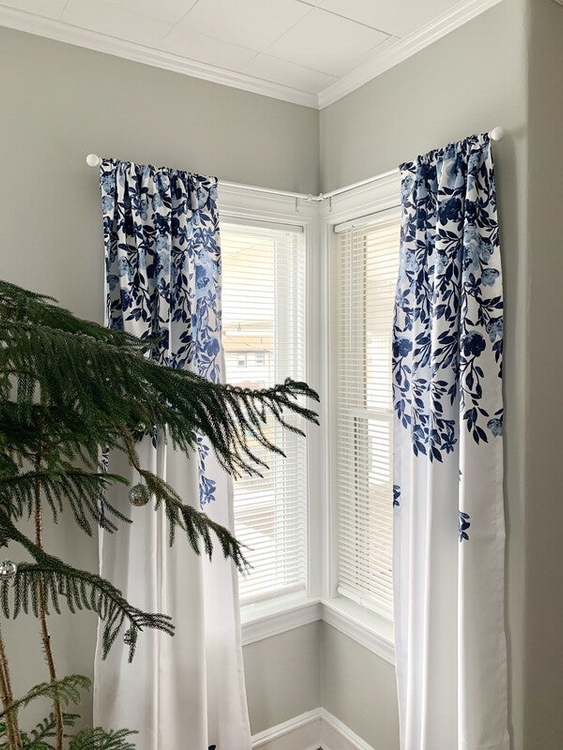
Rods should extend about 4 to 6 inches beyond the window. But because the curtain rods meet in the corner, the total length of the curtain rods depends on the distance between each window.
The tips of the curtain rods should meet in the corner. To determine how far the rod should extend beyond the inner edge of the window, measure the distance between the window and the corner of the room.
How to Hang Corner Curtains the Traditional Way
Now that you’ve taken measurements and found the perfect window treatment for your home, it’s time to get to work!
1. Install Curtain Rod Brackets
Curtain rod brackets support curtain rods and can be installed into the wall, ceiling or window frame.
Here’s what you’ll need to drill curtain rod brackets into your wall:
- Measuring tape or ruler
- A pencil
- Drill
- Screws
- Drywall anchors (Note: these will not be necessary if you are drilling into wall studs.)
- A level
- Curtain rod brackets
Follow the installation instructions for your curtain rod brackets. If you need more direction on how to install your brackets, check out our article here.
2. Connect Your Curtain Rods
Use a curtain rod corner connector to adapt your curtain rods to your window. Remove one finial from either curtain rod and use a corner curtain rod connector to attach the rods.
Pro-tip: If you want to save money, create a corner piece with a plastic elbow. These can be found in the plumbing section of home improvement or hardware stores and can be spray-painted to match your curtain rod.
3. Hang Your Curtains
Now, it’s time for the fun part – hanging your curtains. Just slide the curtains of your choice onto the curtain rods and hang them up!

How to Hang Corner Curtains the Easy Way
Wish you could skip the lengthy, pesky process of drilling curtain rod brackets into your wall?
If you’re renting a home, looking to avoid wall damage, or just want a simpler way to install your curtain rods, we have a solution.
1. Install Kwik-Hang Corner Brackets
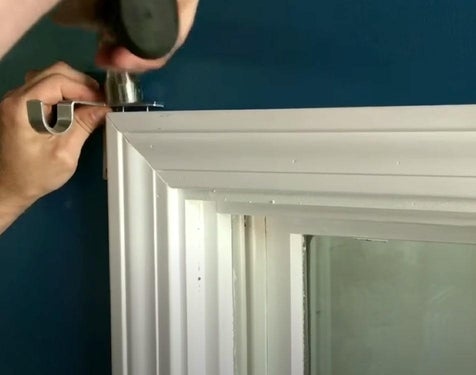
To install Kwik-Hang brackets, position them on the top corner of the outer edge of either window frame. Then, tap it in and repeat on the other side.

2. Install Kwik-Hang Center Support Brackets
Next, install the center support brackets. Each should be placed approximately 4 inches from the inner corner.
Remove one finial from each curtain rod and place your rods so that the finial ends point outward. If you’d like, you can use a curtain rod connector, but this is optional.
That’s it — no hassle!

Kwik-Hang no-drill brackets are a zero-damage, labor-free alternative to traditional brackets. Just align the brackets with the top corners of your window frame and tap them in with a hammer. No drill, level, stud-finder or measuring tape is required.
Hang your curtain rods in seconds with Kwik-Hang’s damage-free curtain rod brackets and explore our selection of curtain rods today!


