How to Hang Curtains in a Dorm


Moving into a college dorm is a big milestone—but let’s be honest, most dorm rooms aren’t exactly cozy or chic.
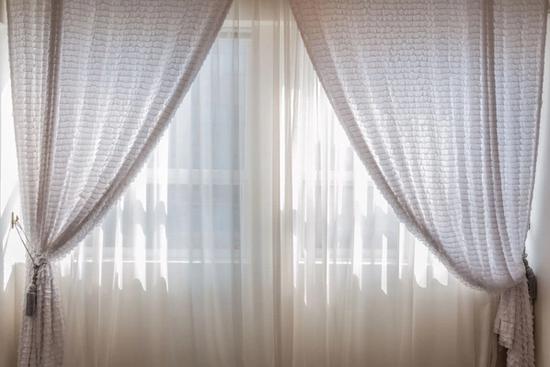
Hanging curtains is one of the easiest ways to create a homely, private space while keeping out unwanted light. But since most colleges don’t allow drilling or nail holes, the question is: how do you hang curtains in a dorm room without breaking the rules?
In this guide, we’ll walk you through five easy methods for hanging dorm curtains without tools or damage.
Read more: 25 Rental Apartment Decorating Ideas
7 Ways to Hang Curtains in a Dorm
There are plenty of smart, damage-free ways to hang curtains in a dorm—no screws, drills, or angry RA visits required. These seven solutions cover every situation you’re likely to face.
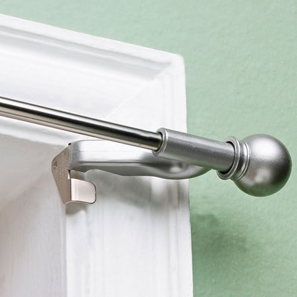
Kwik-Hang Curtain Rod Brackets – Best for Wooden Window Frames
If you're looking for a reliable, no-damage curtain solution that won't harm your walls, Kwik-Hang Curtain Rod Brackets are your best bet. These patented brackets install in seconds and are strong enough to hold even heavy blackout curtains.
Unlike tension rods or adhesive hooks, Kwik-Hang brackets don’t rely on pressure or sticky pads. Instead, they tap securely into your window trim—no screws, nails, or drilling required. Just align, tap, and hang. It’s that simple.
Kwik-Hang brackets support up to 20 pounds and come in multiple finishes and styles for single or double curtain rods, making it easy to layer your curtains.
With prices starting at $12.99 for a pair of single rod brackets and $15.99 for a pair of double rod brackets, Kwik-Hang is the fastest and most affordable way to hang curtains without damage.
Pros:
- Holds up to 20 pounds—perfect for heavy curtains.
- Installs in seconds with no tools or drilling.
- Stylish options for single and double rods.
Cons:
- Can only be used on framed windows.
How to Use Kwik-Hang Brackets in a Dorm:
- Position the curtain rod brackets on the corners of your window frame.
- Tap them in with a hammer and you’re done!
Kwik-Hang Damage-Free Curtain Brackets
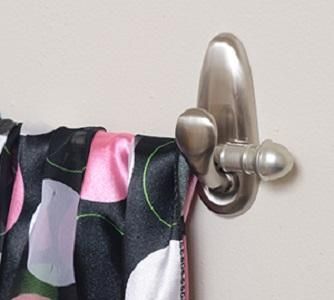
Shop Now3M Command Hooks – Best for Lightweight Curtains
3M Command Hooks are a go-to solution for dorm dwellers who want to hang curtains without damaging walls. These adhesive hooks are dorm-friendly, easy to apply, and even easier to remove without leaving a trace.
Just place a large hook on either side of your window trim and rest a curtain rod across. It’s a simple, affordable option—especially for lightweight curtains or sheers.
Command Hooks come in a wide range of sizes, styles, and finishes, so be sure to pick ones strong enough to support your curtain rod and fabric. Want to upgrade the look? You can even pair them with decorative leather curtain rod straps from Etsy for a more polished, boho-inspired setup.
Pros:
- Affordable and widely available.
- No damage to walls or paint.
- Easy to install and remove.
Cons:
- Only suitable for lightweight curtains.
- Adhesive strength may vary by surface type.
- Hooks are visible, which may not suit all aesthetics.
How to Use 3M Command Hooks in a Dorm:
- Choose a large, heavy-duty hook that can support your curtain rod and curtains.
- Clean the wall or window trim surface thoroughly before applying.
- Stick one hook on each side of the window frame at the desired height.
- Lay your curtain rod across the hooks, thread your curtains, and you’re all set!
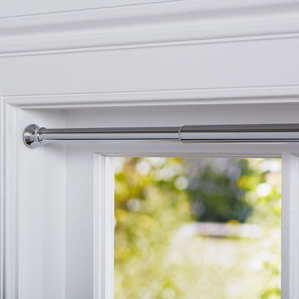
Tension Rods – Best for Windows With Wall Space Between Trim
Tension rods are one of the easiest and most affordable ways to hang curtains in a dorm room—no tools, no mess, and no marks left behind. These adjustable rods use a built-in spring to create pressure between two flat surfaces, holding the rod securely in place.
If there’s space between the window trim and the wall, a tension rod can fit perfectly. They’re ideal for lightweight curtains and sheers, and don’t require any extra brackets or hooks.
Tension rods typically range from $5 to $25 depending on their material, size, and strength. Just keep in mind that while they’re great for convenience, they’re not built to handle heavy curtains or blackout panels.
Pros:
- Budget-friendly and widely available.
- No drilling or tools required.
- Adjustable to fit most window sizes.
Cons:
- Not strong enough for heavy or blackout curtains.
- May slip over time if not properly secured.
- Only works between flat, opposing surfaces.
How to Use Tension Rods in a Dorm:
- Measure the width of your window or the space between the walls where you want to hang curtains.
- Twist the tension rod to extend it until it fits snugly between the surfaces.
- Insert the rod between the walls, adjusting until the end caps are flush and secure.
- Thread your curtains onto the rod and you’re done—no extra hardware needed.
Twist and Fit Curtain Rods – Best for Trim-Mounted Setups
Twist and fit curtain rods offer a more refined and supportive alternative to basic tension rods. Designed for dorm windows that can’t accommodate a regular tension rod, these rods combine an adjustable design with built-in “brackets” that latch onto the window trim—giving you the functionality of traditional hardware without drilling.
With their added stability, twist and fit rods can support medium-weight curtains, making them a smart choice if you want something a little sturdier and more stylish. They offer the perfect blend of convenience and polish for your dorm setup.
Prices typically start around $20–$25, with premium versions going for $50 or more depending on the materials and finish.
Pros:
- More stable than standard tension rods.
- Supports medium-weight curtains.
- Built-in brackets eliminate the need for extra hardware.
Cons:
- More expensive than basic tension rods.
- Not suitable for very heavy curtains.
- May not work with all window trim styles.
How to Use Twist and Fit Curtain Rods in a Dorm:
- Measure your window width and choose the right rod length.
- Adjust the rod to fit snugly across your window.
- Position the built-in brackets against the window trim for added support.
- Thread your curtains onto the rod and install
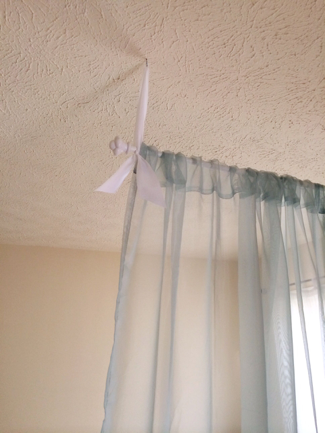
Ceiling Hooks – Best for Room Dividers
Adhesive ceiling hooks offer a creative way to hang curtains from above—perfect for adding privacy in a shared dorm room or creating a more elevated, luxurious vibe with floor-length panels.
You can use them to hang curtains directly from the ceiling or to install a lightweight curtain rod using wire or string. This setup is especially useful when wall space is limited or when you want to divide the room without making permanent changes.
Light-duty adhesive ceiling hooks (like those from 3M’s Command line) are best suited for ultra-light curtains or wire setups. For anything heavier, you’ll want to look for heavy-duty adhesive ceiling hooks, which are widely available on Amazon and other online retailers.
Pros:
- Great for creating privacy or dividing a shared space.
- Offers a stylish floor-to-ceiling curtain look.
- No drilling or wall damage.
Cons:
- Only supports lightweight curtains or wire rods.
- Adhesive strength may weaken over time.
- May not stick well to textured or uneven ceilings.
How to Use Ceiling Hooks in a Dorm:
- Choose lightweight or heavy-duty adhesive hooks based on the weight of your curtains.
- Clean and dry the ceiling surface where you’ll place the hooks.
- Apply the hooks according to the package instructions.
- Hang your curtain rod or wire from the hooks, then attach your curtains for instant ambiance or privacy.
NoNo Brackets – Best for Hanging Curtains Over Existing Blinds
Looking for an easy way to hang curtains over your vertical or mini blinds without drilling? NoNo Brackets are a clever solution designed to attach directly to the headrail of your existing blinds—no screws, nails, or tools required.
These brackets slide right over the top of mini or vertical blind headrails, allowing you to hang a curtain rod without damaging walls or losing your blinds. Ideal for dorm rooms where drilling isn’t allowed but you still want a polished, cozy look.
Pros:
- No drilling, nails, or damage to walls.
- Compatible with mini, vertical, and Venetian blinds.
- Available in different sizes, styles, and finishes.
Cons:
- Requires existing blinds with a sturdy headrail.
- Not ideal for heavy blackout drapes.
How to Use NoNo Brackets in a Dorm:
- Identify whether your blinds are mounted inside or outside the window frame.
- Choose the right NoNo Bracket style—Standard, XL, or Mini (for mini blinds).
- Remove any plastic covers on the blind headrail, if applicable.
- Slide the bracket onto the headrail.
- Insert your curtain rod into the bracket, hang your curtains, and enjoy instant privacy and style—no damage required.
Magnetic Curtain Rods – Best for Metal Frames and Doors
If your dorm room has a metal door or metal window frame, magnetic curtain rods offer an easy, damage-free way to hang curtains—no drilling, screws, or tools needed.
These rods use strong magnets to cling to metal surfaces and typically come with adjustable widths to fit your space. Great for softening bright light and creating a more private feel on metal doors or narrow windows.
Keep in mind that magnetic rods can shift if bumped, so they may not be ideal for high-traffic areas. For extra stability, consider using both top and bottom rods to reduce curtain sway.
Pros:
- No tools or drilling required.
- Adjustable width for a better fit.
- Works well on metal doors or frames.
Cons:
- May shift out of place with frequent use.
- More expensive for heavier curtain options.
- Best with both top and bottom rods to prevent movement.
How to Use Magnetic Curtain Rods in a Dorm:
- Measure your window or door to choose the right curtain size.
- Check that the space around your metal surface can accommodate the rod brackets.
- Snap the magnetic brackets onto the door or frame.
- Thread your curtains onto the rod and place it into the brackets—done in seconds!